
How to Create Bootable USB for Mac on Windows 10 in 4 Ways?
Create Bootable USB for Mac on Windows 10, Mac and Windows file system is completely different, so you are not able to create bootable USB for Mac with PowerShell, CMD or Rufus. If you remembered, till MacOS sierra the Apple file system was Hackintosh, but MacOS 10.13 High Sierra has the technology of Apple Filesystem. that’s why we can’t create bootable USB with Windows tools. But there are other sites are available on the web, which will create a bootable USB for Mac. A good example is TransMac, Disk32Imager and most importantly Virtual Machines will help us to create bootable USB.
Adobe After Effects CC 2018 Download Link At The Bottom of this Article
- Create Bootable USB for Mac with TransMac
- How to create Bootable USB for Mac with Disk32Imager?
- Step by Step Guide to Create Bootable USB for Mac with Unibeast
- How to Create Bootable USB for Mac with Disk Maker X 6?
How to Create Bootable USB for Mac on Windows 10 with TransMac?
The 1st third party software which can create bootable USB is TransMac. Basically, it is not an open source software, it has the trial of 15 days. After 15 days you won’t be able to create bootable USB for Mac with TransMac. So, try to find a portable software of TransMac. So, for further information about TransMac, Read the below stuff.
Create Bootable USB for Mac on Windows 10
What is TransMac?
TransMac is From Acute Systems is a Windows Software which developed to manage files on Apple Drives and Devices. Which Includes App Drives, devices and Mac Formatted File System, USB Flash Drives, and other storage devices. The Other feature which TransMac has, is the burn ability, which can burn disc images and dmg and sparse image files to output devices.
Required Files:
- TransMac
- MacOS High Sierra setup
- A 16 GB USB Flash Drive
Step 1. First, visit the TransMac site, then download and Install it on your Windows Operating system. It will also work with other Microsoft Operating systems too which Includes Windows 7, Windows 8, 8.1 and Windows Server.
Step 2. Install Process is very easy and even a kid can do that without any error. After that Right-click on the USB Flash Drive then choose “Restore with disk image“.
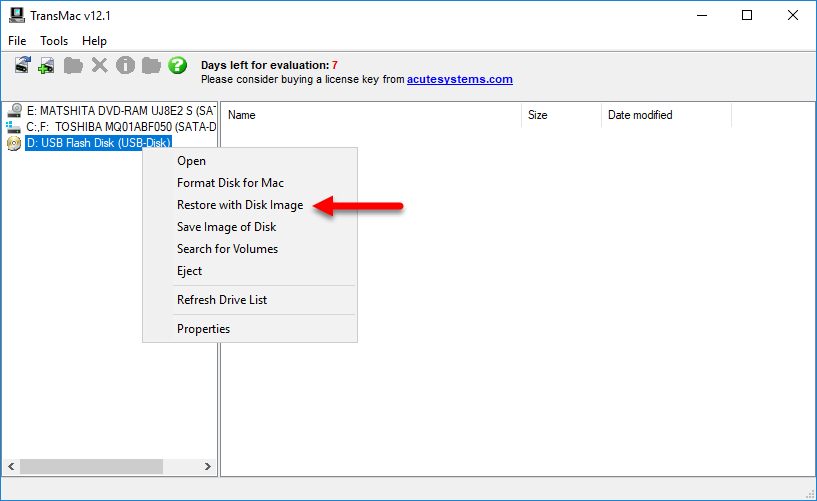
Step 3. After that, it will prompt you that all the files and the partition will be overwrite. To confirm with the Overwrite select yes and go on.
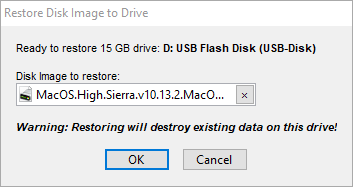
Step 4. Now a new Window will open where you have to browse for MacOS High Sierra .dmg file. When you find that select ok. After that wait at least for 20 minutes to bootable that.
And Finally Congratulations for creating Bootable USB for Mac on Windows. Now go ahead and boot MacOS High Sierra both on Windows or Mac Systems.
How to Create Bootable USB for Mac on Windows 10 with Win32 Disk Imager?
TransMac is not the only software on Windows which can Create Bootable USB for Mac on Windows 10. There is other software like Dism32imager, which is an open source compare to the TransMac.
Requirements:
- MacOS High Sierra.dmg or MacOS Sierra.raw
- Win32 DiskImager
- 16 GB USB Flash Drive
Step 1. After downloading the required files, install WinRAR and Extract the MacOS Sierra from Zip file.
Step 2. Install Win32 DiskImager. The Installation is so much easy so there is no need of any screenshots.
Step 3. After installing the Win32 DiskImager, open it and click on the directory and browse for MacOS High Sierra.
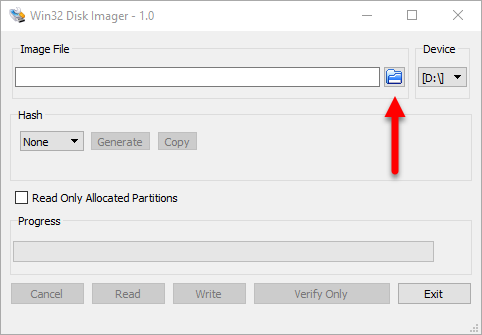
Step 4. Since MacOS Sierra extension is .raw or .dmg, you need to select other options which have 3 back to back stars symbol. For a better understanding look at the screenshot.

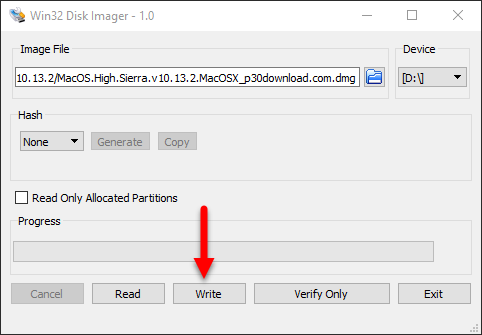
Step 5. When the MacOS High Sierra is selected, select write and wait until it creates a Bootable USB for Mac on Windows 10.
Creating Bootable USB Process
How to Create Bootable USB for Mac on Windows 10 with Virtual Machine?
You may be thinking whether this is not possible to create bootable USB drive for MacOS with Virtual machine, But Yes, we can create a bootable USB for Mac in Windows with Virtual Machine. Doesn’t matter if you are using VirtualBox or VMware Workstation Pro. All I know is that we can Create Bootable USB for mac with Virtual Machine.
The idea to create a Bootable USB for Mac with Virtual Machine is:
- First, we will Install MacOS High Sierra on Virtual Machine.
- When we Installed MacOS High Sierra, we will use Unibeast to Create Bootable USB for Mac.
The Good thing about this method is, that is lengthy but it gives you 100% result. So, if you want to start with this method follow the below steps, and create bootable USB for Mac on Windows 10.
How to Install MacOS High Sierra 10.13 on VirtualBox on Windows 10?
We’re not putting pressure on that 100% you have to VirtualBox, In fact, VMware Workstation Pro much comfortable. Since VirtualBox is an open source software, that’s why we’re using it. But before getting started Please click on the below links and download the needed files for this method.
Requirements:
- WinRAR
- Virtual Box
- MacOS Sierra 10.12 VMDK file Format
- Codes For Enabling MacOS High Sierra Installation
Create Virtual Machine For MacOS High Sierra on VirtualBox
Step 1. Download and Install VirtualBox on your computer. When you installed it, simply double click and open it.
Step 2. Select New Under the menu and create a New Virtual Machine for MacOS High Sierra 10.12 with any name. Just Remember to select the type, Mac OS X, and the version should be macOS 10.13 High Sierra 64 bit. After that, you have to specify the memory size for mac. We will simply put the amount of its RAM to 4GB.

Step 3. In this Step, you have to select the macOS High Sierra VMDK file format which you had download before. To do that select use an existing Virtual Hard Disk File, then browse the VMDK file and select that.

Create Bootable USB for Mac on Windows 10
Step 4. When the Virtual Machine is created, you need to apply some settings in order to boot mac normally. Open the settings of created Virtual Machine, visit the system tab> uncheck the floppy disk. This time visits the process tab and increases the process from 1 to 2 processors.
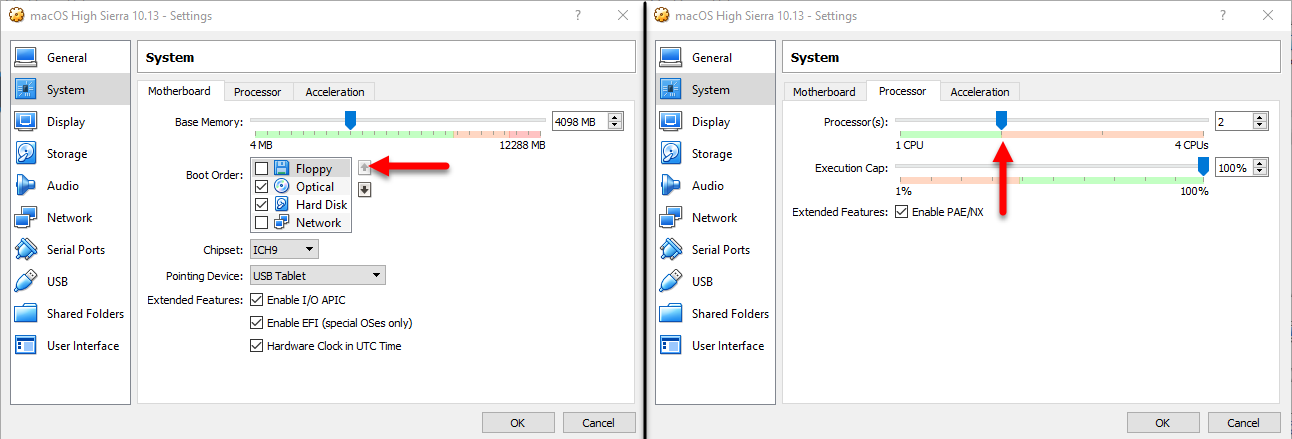
Step 5. Now leave the System tab and move to the Display section, increase the Video Memory all the way to the last. Also, Enable the 3D Acceleration. When you are done with of them, click ok.

Step 6. Visit the file tab and select exit to exit the Virtual Machine.

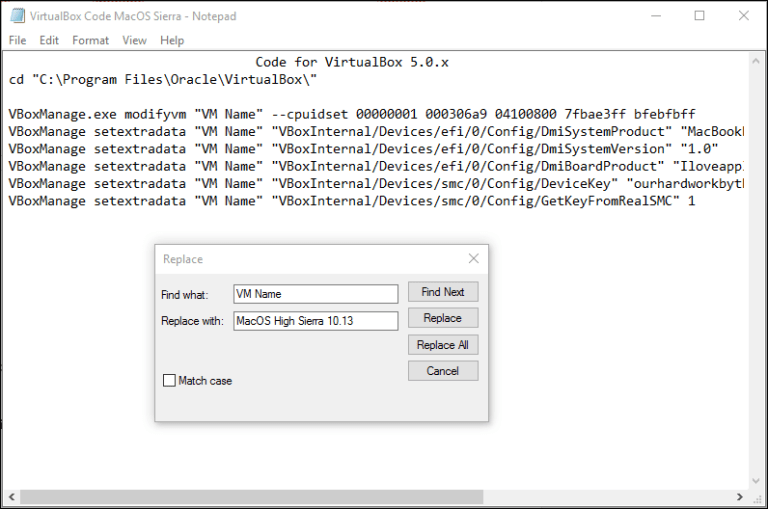
Step 7. After creating and applying settings for the created Virtual Machine, Now you have to insert the codes in order to Install MacOS High Sierra. To do that, open CMD as Administrator and apply the codes one by one on the cmd.
Create Bootable USB for Mac on Windows 10
Code for VirtualBox 5.0.x
cd “C:Program FilesOracleVirtualBox”
VBoxManage.exe modifyvm “VM Name” –cpuidset 00000001 000306a9 04100800 7fbae3ff bfebfbff
VBoxManage setextradata “VM Name” “VBoxInternal/Devices/efi/0/Config/DmiSystemProduct” “MacBookPro11,3”
VBoxManage setextradata “VM Name” “VBoxInternal/Devices/efi/0/Config/DmiSystemVersion” “1.0”
VBoxManage setextradata “VM Name” “VBoxInternal/Devices/efi/0/Config/DmiBoardProduct” “Iloveapple”
VBoxManage setextradata “VM Name” “VBoxInternal/Devices/smc/0/Config/DeviceKey” “ourhardworkbythesewordsguardedpleasedontsteal(c)AppleComputerInc”
VBoxManage setextradata “VM Name” “VBoxInternal/Devices/smc/0/Config/GetKeyFromRealSMC” 1
Code for Virtualbox 4.x:
cd “C:Program FilesOracleVirtualBox”
VBoxManage.exe modifyvm “Your VM Name” –cpuidset 00000001 000306a9 04100800 7fbae3ff bfebfbff
VBoxManage setextradata “Your VM Name” “VBoxInternal/Devices/efi/0/Config/DmiSystemProduct” “MacBookPro11,3”
VBoxManage setextradata “Your VM Name” “VBoxInternal/Devices/efi/0/Config/DmiSystemVersion” “1.0”
VBoxManage setextradata “Your VM Name” “VBoxInternal/Devices/efi/0/Config/DmiBoardProduct” “Iloveapple”
VBoxManage setextradata “Your VM Name” “VBoxInternal/Devices/smc/0/Config/DeviceKey” “ourhardworkbythesewordsguardedpleasedontsteal(c)AppleComputerInc”
VBoxManage setextradata “Your VM Name” “VBoxInternal/Devices/smc/0/Config/GetKeyFromRealSMC” 1

Note: Before pasting the codes in the CMD you have to type your Virtual Machine Name instead of VM Name on the codes. For Better understanding looking at the screenshot how we have replaced all the code with Notepad.
Install MacOS High Sierra 10.14 on VirtualBox on Windows 10
Step 1. When you created the Virtual Machine and applied the codes, it is time to install the macOS High Sierra on VirtualBox on Windows 10. To do that, open the VirtualBox and start the created Virtual Machine.
Step 2. Wait for some minutes until the apple logo should go away, after that you will be directed to the welcome screen. Select your country and click continue, then you have to select your keyboard layout and click continue.
Step 3. On the page to transfer information to this Mac, select Don’t Transfer any information now and click continue.
Step 4. Next steps are too much easy and we have not provided any screenshots.
- Enable your location services and click continue.
- Sign in with your Apple ID or not, that your choice. When you are done click continue.
- Agree to the terms and conditions of MacOS High Sierra and click Continue.
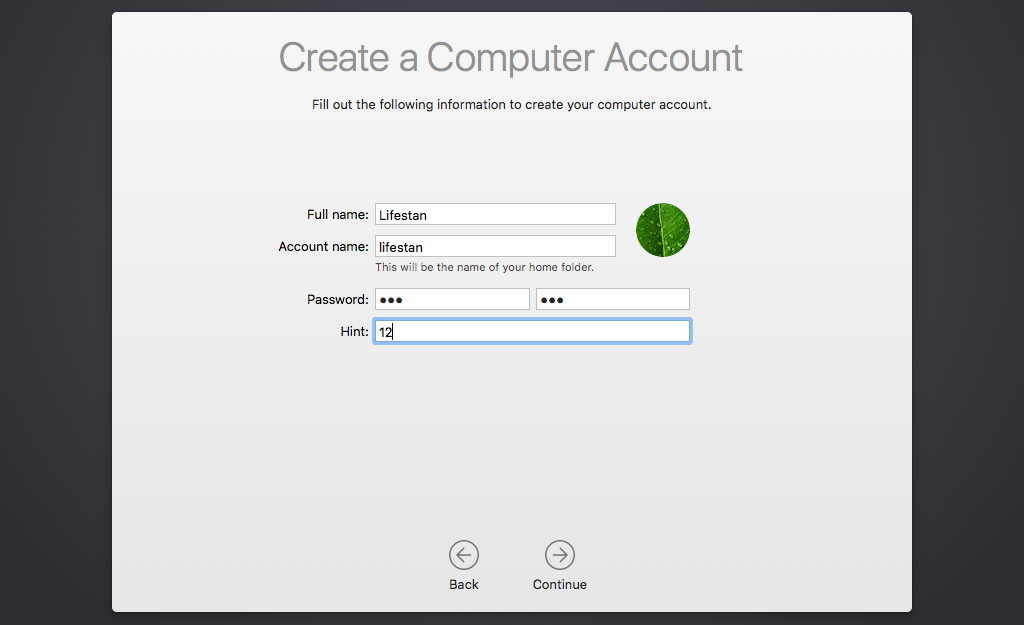
Step 5. Now go ahead and insert your data to create an Account for macOS High Sierra. After that on the diagnose and usage page click continue and wait until it should setup the screen for you.
How to Create Bootable USB For Mac on Windows 10 with Unibeast?
Now that you have created and Installed MacOS Sierra on VirtualBox, download the below files to create bootable USB for Mac in Windows.
- Unibeast
- MacOS High Sierra .dmg file format
- A 16 GB USB Flash Drive
After downloading the below files, move or copy the Unibeast and MacOS High Sierra.dmg file to the created Virtual Machine.
Create bootable USB Mac disk utility
Step 1. Download the MacOS High Sierra .dmg file, and extract that anywhere on your Running Mac Virtual Machine. After that open it and drag the Install MacOS High Sierra on Applications. When the Install MacOS High Sierra is copied, attached your USB Flash Drive.
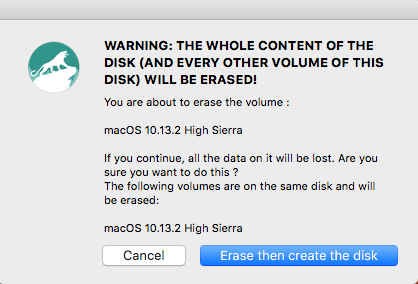
Step 2. In this Step Hold Windows + Space Buttons together to open Spotlight search engine, then type their Disk Utility and Press enter. When the Disk Utility Opens, select erase and Apply the below settings:
- Name: MacOS High Sierra Bootable USB Drive
- Format: Select OS X Extended (Journaled).
- Scheme: GUID Partition Map
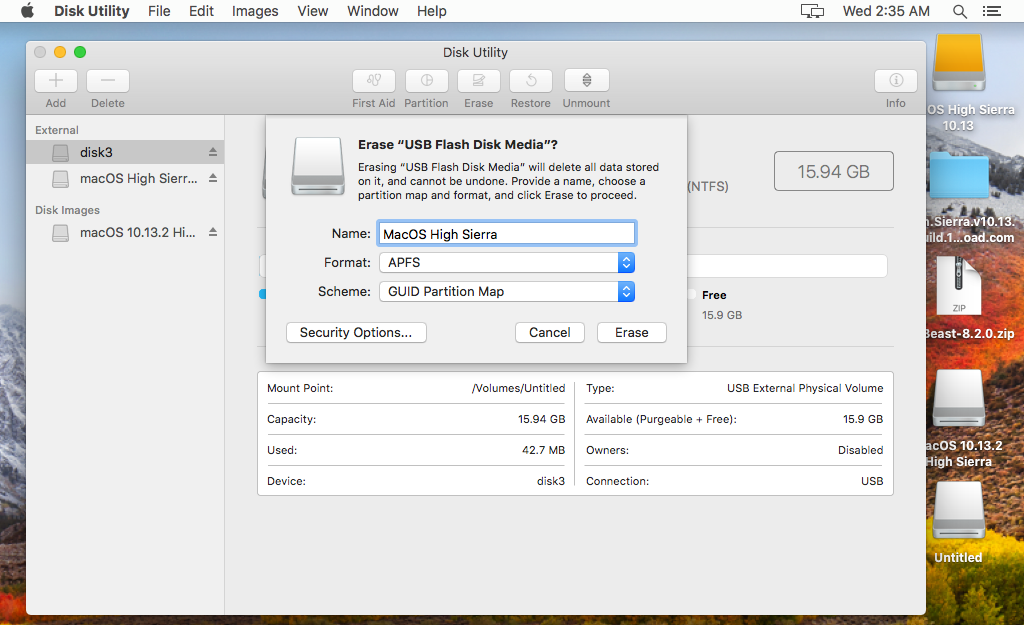
When you are done with all of them, select erase so the USB should format the settings which we mentioned below for mac.
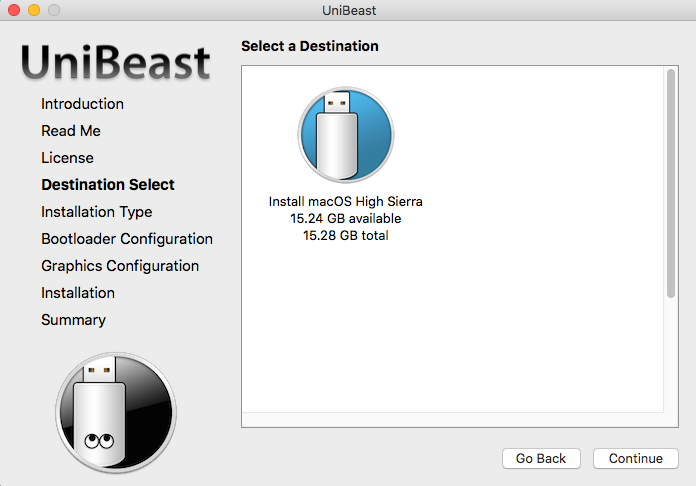
Step 3. When the erase process completes, close Disk Utility, and Open Unibeast. From Step one to step five of Unibeast click continue, after that on the destination screen, select the USB and click continue.
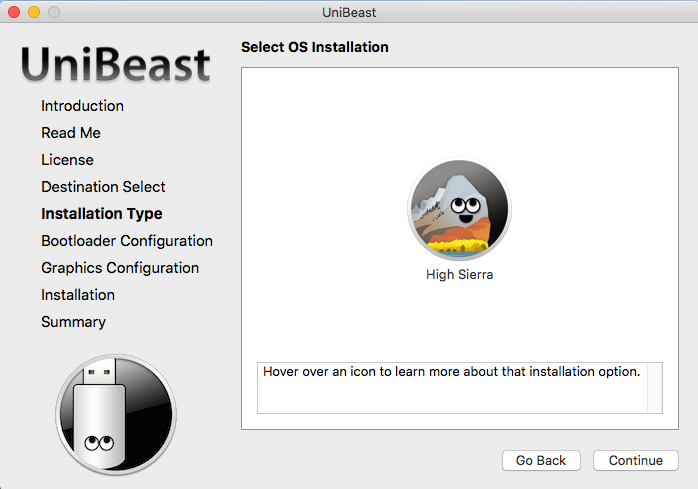
Step 4. On the Installation, type select the High Sierra. Basically, it is the App which you had dragged on step 1 to the Applications. If there should be another App, like MacOS Sierra, they both would appear.
Create Bootable USB for Mac on Windows 10
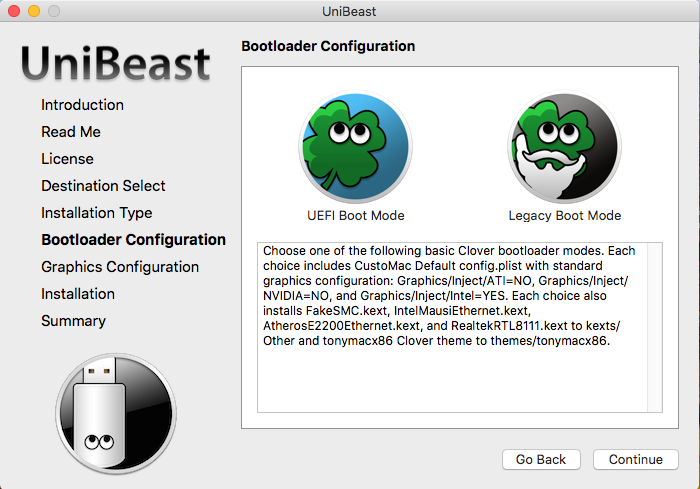
Step 5. This step is about configuring Bootloader. Basically, Unibeast provides you the two UEFI Boot and the Legacy boot mode. According to your system boot, select that option, I will select UEFI Boot.
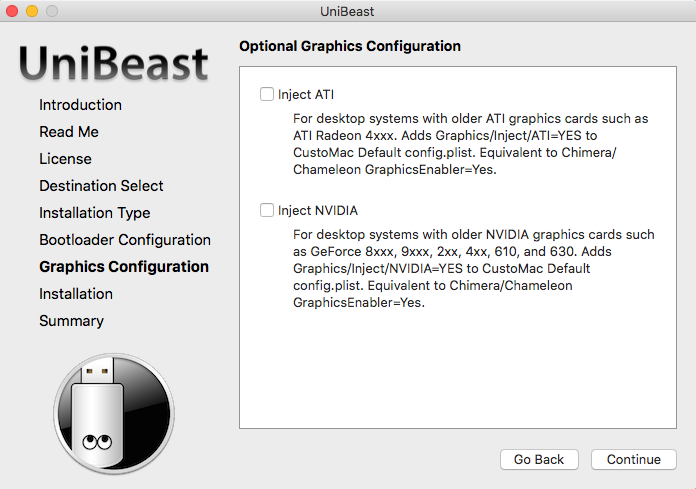
Step 6. The graphics Configuration is optional, but everyone who is creating Bootable USB for Mac with Unibeast they will leave it empty. We will do also the same, so we recommend you to simply select continue.
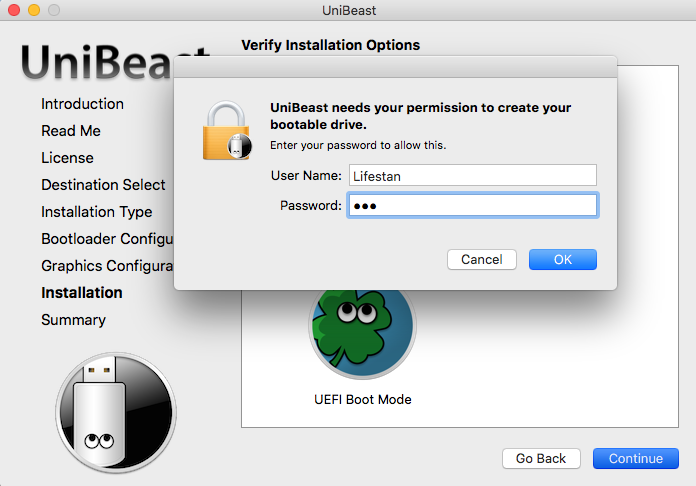
Step 7. In the last step, Unibeast will ask you to verify the Process to Bootable the USB. All you need is to enter your Username and Password of your account.
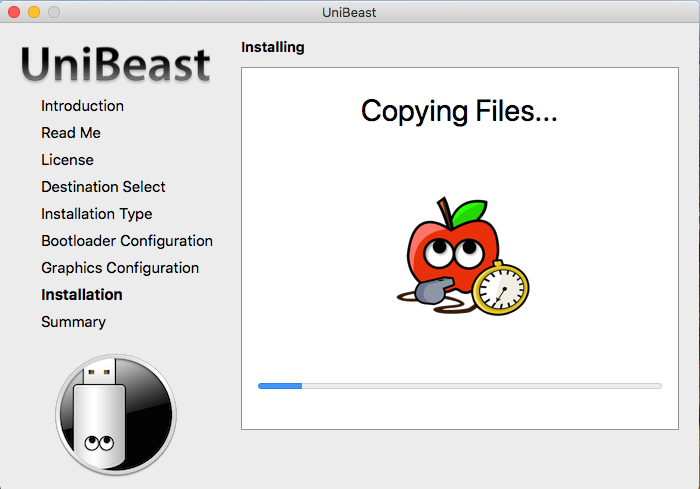
Step 8. Now you have to wait about 40 minutes until unibeast should create a Bootable USB for Mac in Windows 10.
UniBeast will now create the bootable USB drive. The process will only take about 40 minutes, depending on the system and drive speed. Do not unplug or stop during this time.
Create Bootable USB with DiskMaker X 6
In order to Create Bootable USB for Mac on Windows 10 with DiskMaker X 6, first, you have to install macOS High Sierra or lower version of mac on VirtualBox or VMware on Windows 10. Once you installed macOS 10.13 High Sierra follows the below steps and create a Bootable USB for mac on Windows 10.
MacOS sierra bootable USB
macOS Sierra bootable USB, DiskMaker X 6 is another Application which allows you to create bootable USB on a Mac. Diskmaker x 6 is an open source application which has built with AppleScript. Since it has created with AppleScript it can support many versions of OS X macOS to create a bootable USB Installer. If you have downloaded the macOS High Sierra 10.13 from the link which I provided you, then it has DiskMaker X 6. But if you have not download macOS 10.13 High Sierra from Apps store then you will need to download this app manually from its site. Another information which I want to share with you is, that most of the time it responds to those apps which have been downloaded from the AppStore. So, if while creating a Bootable USB if you face that it can’t detect the Operating system, then you have to download macOS 10.13 High Sierra from AppStore. That not the .dmg file which you have downloaded on your Windows 10 system won’t work.
Step 1. Once you have downloaded the Install macOS Sierra and DiskMaker X 6, add both of them to an application.

Create Bootable USB for Mac on Windows 10
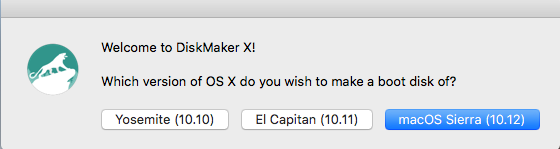
Step 2. Go ahead and launch the DiskMaker X 6, after that select a Version of operating systems like Yosemite, El Captain or MacOS Sierra. Since macOS High Sierra is a version of macOS Sierra, we will select the macOS Sierra.
Step 3. Here the DiskMaker X 6 will detect the Operating system. If it was the operating system, select use this copy if it wasn’t select use another copy. So, this is the App which we had downloaded, then we will select the use this copy.

Step 4. This step is about configuring the USB. If you want to dual boot the USB, select another kind of disk, if not select an 8GB thumb drive.

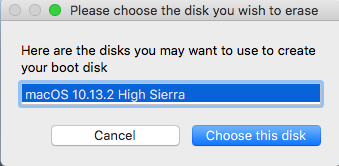
Step 5. Choose the disk which you want to boot their MacOS High Sierra 10.13.
Step 6. Once you select the disk it will erase the disk, in other words, it will partition the disk as macOS needs.
Step 7. Now you need to give full access, in other words, allow the administrator privileges but inserting your password.

Step 8. Once you insert your password, wait until it should create a bootable USB for Mac.

Click: Download Adobe After Effects CC 2018 Free
Conclusion:
This was all about How to Create Bootable USB for Mac on Windows 10? I hope this article will help you to create bootable USB for Mac on Windows 10. If you have any idea or suggestion Please comment on the article.
[…] How to Create Bootable USB for Mac on Windows 10 in 4 Ways? […]
[…] How to Create Bootable USB for Mac on Windows 10 in 4 Ways? […]
[…] How to Create Bootable USB for Mac on Windows 10 in 4 Ways? […]
[…] Muse CC 2018 Free Download is a very effective web design program in Adobe Innovative Cloud that can take care of all the programming for developing websites. It is the best atmosphere for […]
[…] Create Bootable USB For Mac On Windows […]