
Install Android Oreo on Virtual Box and VMWare Windows 10
Install Android Oreo on VirtualBox on Windows 10 Just in 6 minutes. But before getting started, first read the gathered information about the Android 8.0. Android 8.0 Oreo is developed by Google for the mobile operating system (OS), which is based on the Linux Kernal. While introducing the Android 8.0 Oreo, they have claimed that this android is smarter, faster, more powerful and sweeter than ever. In the meantime, the solar eclipse, which has been powered by the Android 8.0 Oreo, has said that Android 8.0 Oreo is about bringing your favorite cookies to Android Environment. They are too enthusiast with the enhancements both for consumers and enterprises. Another technology which they have added is the UEM technology, which stands for unified endpoint management. Now you may be thinking what is unified endpoint management technology. Well, it is all about security, it is an approaching technology for securing and controlling computers, laptops, smartphones, and tablets.
Android Virtualbox installation & Android Vmware installation
Another Information which I want to share is that Android Oreo ISO is now available for download. Previously it wasn’t available for Virtualization software such as Hyper-V, VMWare, and VirtualBox. If you are not interested in how to Install Android Oreo on VirtualBox or VMware, you can simply use the Android Studio, which is epically designed for Android Developers.
Related Articles:
Required Files:
Install Android Oreo on VirtualBox on Windows 10?
Step 1. After downloading the required files, first, install the Oracle Virtual Box. Its installation is too much easy so, I thought it won’t require any screenshot.
Step 2. Now go ahead and launch the VirtualBox. Select New and Create a New Virtual Machine. In this case, I will select the Virtual Machine Android Oreo. Since it is a Linux version, Virtual Box will verify it with no time. Also, you can choose the version of the Virtual Box, whether it should be 64-bit or 32-bit version. I will go with default settings of 64 bit Version.

Step 3. Specify the amount of memory for the Virtual Machine. I recommend using 2GB RAM, although the required amount of RAM is 1GB. But For better performance and quick response, I will increase it to 2GB.

Step 4. Once you specified the size of RAM for Android Oreo, you have to create Hard Disk for it. Since we are using an ISO file to Install Android Oreo, I will just create a New Hard Disk.

Step 5. Select a Hard Disk type and click next. I will go with the default settings of VirtualBox. If you have used Hyper-V, that you would know even better know, what a VHD is and what is VHDx.

Step 6. In this step, you have to verify a storage type between fixed or dynamic. I recommend you to use the dynamic because it will use the created storage as many files are stored in it. But fixed is a fixed size which will be specified by the creator. If you create a 12 GB Hard Drive with fixed partition, it stores exactly 12 GB storage on your Hard Disk. But if you use Dynamic version, it will slowly store the drive to fix 12 GB Hard Drive.

Step 7. This step is about configuring the storage size and location size. In this case, I will go with the default settings VirtualBox, which is 12 GB storage and its location is in the Documents and the Drive C.

Step 8. Now we need to add the Android Oreo ISO to the Virtual Machine. Select settings > Storage, then select the empty drive. Now select the DVD icon and insert the Android Oreo.

How to Install Android Oreo on VirtualBox?
Step 1. Once you inserted the Android Oreo ISO, start the Virtual Machine.

Step 2. Once the Android Starts running, select the 4th one which is the Install Android-x86 to HardDisk. If you don’t want to install just go ahead and use the live test.

Step 3. Now, create a new partition and install on it the Android Oreo. Select create/modify partitions and hit enter.

Step 4. Once you created the Drive, it is time to configure its partition type chose GPT or MBR. In this case, I will go with the MBR version. So I will simply select No to the GPT option.

Step 5. Now you have to configure the Drive. Select New, then choose the primary for the Partition type. After that, you have to configure the size of the drive.

Step 6. Once you created the Drive, specified its size, now you have to bootable that. Once you select bootable under the flag it will write boot.

Step 7. Once you did that, select write, then type yes and press enter on the keyboard.
Step 8. The partition is created and now you can quit the partition. So, select quit and press enter.

Step 9. Once you quit the partition, you will be prompted to select the drive to install Android Oreo. So, select the drive which we created.

Step 10. Select a file system for the Drive, I will simply select the ext4 which is the latest version of Linux version.

Step 11. Now confirm the partition by selecting yes, in order to format the drive.

Step 12. For Bootloader select yes and go on.

Step 13. Now, it will ask if you would like the root drive should have the accessibility of Read and Write. If you are interested, simply select yes, if not select no. Another information which I want to share with you is that with selecting no you will have only to write option of the root drive, not the Write option.

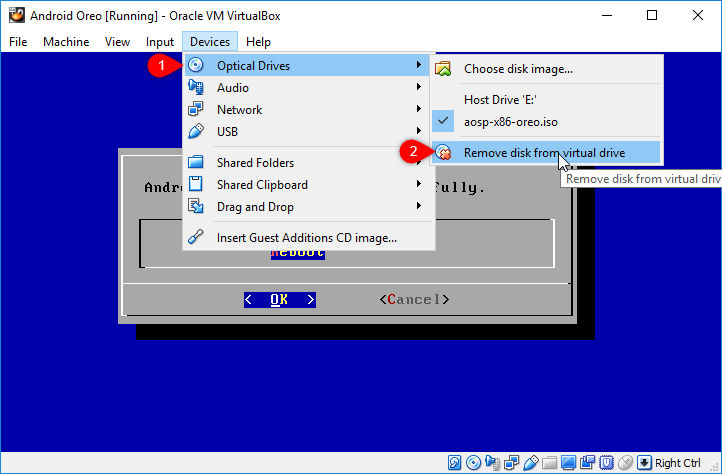
Step 14. Once you passed the directory, remove the ISO and Reboot the Android Oreo.
Step 15. Once it reboots, you will on the bootloader menu. Select the first option and hit enter on the Keyboard.

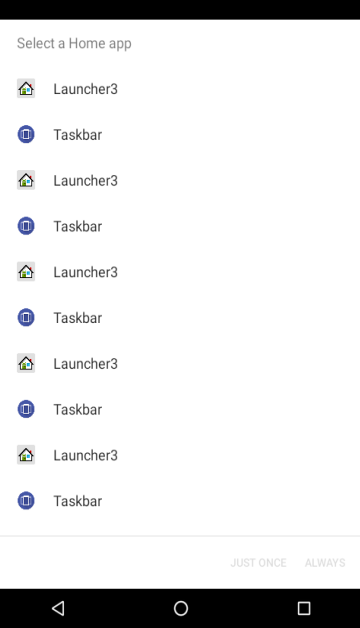
Step 16. Wait for some seconds until the android should go away. First select close and then choose a launcher for Android. I will simply select the Launcher3.
Step 17. Congratulations for Installing Android Oreo on VirtualBox on Windows 10.
Conclusion:
That’s it with Step by Step Guide to Install Android Oreo on VirtualBox. We hope this article will help you to Install Android Oreo on VirtualBox. Please feel free to comment about any problem you face.
[…] read also: Install Android Oreo on Virtual Box and VMWare Windows 10 […]
[…] Install Android Oreo on Virtual Box and VMWare Windows 10 […]
[…] Install Android Oreo on Virtual Box and VMWare Windows 10 […]
Hi is there a way to install apps on the device through playstore.
Yes, there is
no dear